No matter where you live in the beautiful USA, the pH and nutrient characteristics of our soils vary greatly. The ability of the soil to provide nutrition to a plant is critical to the overall health of a plant. When a soil is unable to provide nutrients in the proper amounts, it can lead to reduced plant strength/health and increased susceptibility to damage from disease, insects, drought and other conditions. Not what your new sod wants to face after we deliver.
Routine soil testing is a great tool to help point out nutrient deficiencies and surpluses, soil pH, and Cation Exchange Capacity (CEC). Understanding the test results allows for the selection of the appropriate fertilizer or amendments to help correct deficiencies and other problems to optimize the uptake of fertilizer nutrients by the plant.
Soil pH
Optimum soil pH is species dependent, but generally speaking, grass, shrub and flower nutrient uptake is maximized when soil pH is between 6.0 and 7.0. Most soil nutrients are readily available when the soil pH is 6.5. If pH drops below 6.0 and soils are more acidic, elements like manganese and aluminum become more soluble and their excessive uptake can reach toxic levels causing plant stress and failure.
Conversely, high pH or highly alkaline soils usually suffer from reduced nutrient, and especially micronutrient lock-up (iron, magnesium and calcium). They can have high concentrations of sodium resulting in poor soil structure. Water and essential nutrients don't easily penetrate poorly structured soils, resulting in nutrient deficiencies and stunted plant growth.
Changing Soil pH
Soil pH is typically lowered with sulfur and raised with lime. Pelletized lime is generally the preferred method of lime application over granular for raising pH as it is much easier to apply, pellets break down with water, are less dusty and pelletized lime changes the pH quicker than granular lime. Dolomitic or calcitic lime may be used depending on the soils need for magnesium or calcium.
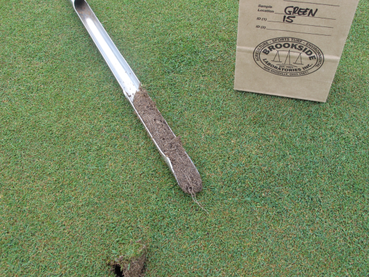
Proper Sampling of Your Soil
Soil test results are only as good as the samples collected and sent to the lab for analysis. IMPROPER sampling is the largest area for error in the soil testing process and can lead to test results that could recommend over- or under application of nutrients and amendments.
Make sure to collect a representative sample of each area being tested. 1-2 cups of soil are needed for proper testing and should be free of plant tissue, thatch, mulch or other surface debris. For areas up to 10,000 sq. ft., 10-12 individual cores should be randomly taken and combined to make one composite sample to be placed in a sample bag. For areas over 10,000 sq. ft., randomly take one extra core for each additional 1,000 sq. ft.
Separate samples should be collected from areas that differ in soil color, soil texture, and type of plants grown. Avoid areas that have recently been fertilized or amended. Turf should be sampled at a depth of 3" below the thatch layer, while trees, shrubs and ornamentals should be sampled to a depth of 6-12" with cores being taken from inside and just outside the drip line.
The Benefits from Testing Your Soil
Soil testing is an agronomic Best Management Practice (BMP) recommended by the fertilizer industry, university agronomists and independent consultants that provides many benefits to the turf/landscape manager including:
• Monitors pH and nutrient levels in turf and landscape soils
• Offers corrective action to optimize nutrient uptake (reduce lost fertilizer $$ from nutrient lock-up)
• Aids in customization of fertility programs
• Allows you to grow a healthy and flourishing landscape to put your stamp on!
OUR VIEW
When all said and done, we like to compare newly delivered sod to a newborn baby. You wouldn't want to bring your newborn baby home to no food, milk, baby crib etc... Chances of your baby getting sick and not surviving is likely. The same could be thought of for sod. Your sod is freshly cut, delivered and ready to grow at it's new home; however, if the area isn't ready for the sod to grow successfully, it probably won't survive in the long run.
Take the extra steps and spend a few extra dollars to properly prepare the area you want your new sod to be installed! Don't take the shortcut to save a few hundred dollars. Get the job done right the first time and this will prevent you from having to re-sod your lawn months or a year down the road.
John Deere Landscapes in Longwood, Florida offers Soil Testing. Bring your soil samples to them and they will ship it to the University of Florida for testing. Usually takes about 2-3 weeks. You can reach the Longwood John Deere Landscapes at 407-332-8933
Routine soil testing is a great tool to help point out nutrient deficiencies and surpluses, soil pH, and Cation Exchange Capacity (CEC). Understanding the test results allows for the selection of the appropriate fertilizer or amendments to help correct deficiencies and other problems to optimize the uptake of fertilizer nutrients by the plant.
Soil pH
Optimum soil pH is species dependent, but generally speaking, grass, shrub and flower nutrient uptake is maximized when soil pH is between 6.0 and 7.0. Most soil nutrients are readily available when the soil pH is 6.5. If pH drops below 6.0 and soils are more acidic, elements like manganese and aluminum become more soluble and their excessive uptake can reach toxic levels causing plant stress and failure.
Conversely, high pH or highly alkaline soils usually suffer from reduced nutrient, and especially micronutrient lock-up (iron, magnesium and calcium). They can have high concentrations of sodium resulting in poor soil structure. Water and essential nutrients don't easily penetrate poorly structured soils, resulting in nutrient deficiencies and stunted plant growth.
Changing Soil pH
Soil pH is typically lowered with sulfur and raised with lime. Pelletized lime is generally the preferred method of lime application over granular for raising pH as it is much easier to apply, pellets break down with water, are less dusty and pelletized lime changes the pH quicker than granular lime. Dolomitic or calcitic lime may be used depending on the soils need for magnesium or calcium.
Proper Sampling of Your Soil
Soil test results are only as good as the samples collected and sent to the lab for analysis. IMPROPER sampling is the largest area for error in the soil testing process and can lead to test results that could recommend over- or under application of nutrients and amendments.
Make sure to collect a representative sample of each area being tested. 1-2 cups of soil are needed for proper testing and should be free of plant tissue, thatch, mulch or other surface debris. For areas up to 10,000 sq. ft., 10-12 individual cores should be randomly taken and combined to make one composite sample to be placed in a sample bag. For areas over 10,000 sq. ft., randomly take one extra core for each additional 1,000 sq. ft.
Separate samples should be collected from areas that differ in soil color, soil texture, and type of plants grown. Avoid areas that have recently been fertilized or amended. Turf should be sampled at a depth of 3" below the thatch layer, while trees, shrubs and ornamentals should be sampled to a depth of 6-12" with cores being taken from inside and just outside the drip line.
The Benefits from Testing Your Soil
Soil testing is an agronomic Best Management Practice (BMP) recommended by the fertilizer industry, university agronomists and independent consultants that provides many benefits to the turf/landscape manager including:
• Monitors pH and nutrient levels in turf and landscape soils
• Offers corrective action to optimize nutrient uptake (reduce lost fertilizer $$ from nutrient lock-up)
• Aids in customization of fertility programs
• Allows you to grow a healthy and flourishing landscape to put your stamp on!
OUR VIEW
When all said and done, we like to compare newly delivered sod to a newborn baby. You wouldn't want to bring your newborn baby home to no food, milk, baby crib etc... Chances of your baby getting sick and not surviving is likely. The same could be thought of for sod. Your sod is freshly cut, delivered and ready to grow at it's new home; however, if the area isn't ready for the sod to grow successfully, it probably won't survive in the long run.
Take the extra steps and spend a few extra dollars to properly prepare the area you want your new sod to be installed! Don't take the shortcut to save a few hundred dollars. Get the job done right the first time and this will prevent you from having to re-sod your lawn months or a year down the road.
John Deere Landscapes in Longwood, Florida offers Soil Testing. Bring your soil samples to them and they will ship it to the University of Florida for testing. Usually takes about 2-3 weeks. You can reach the Longwood John Deere Landscapes at 407-332-8933